Getting started in the intricate world of Security & Hacking?
A virtual hack lab is an environment of operating systems that security professionals use to test out new attack techniques, create exploits, debug, reverse engineer, developing malware, and all the cyber security related stuff.
A virtual hack lab is an environment of operating systems that security professionals use to test out new attack techniques, create exploits, debug, reverse engineer, developing malware, and all the cyber security related stuff.
You can host a virtual hack lab using just 1 computer.
The only downside being you need to have at least a moderate level of specs in
the hosting computer.
Virtual hack labs can contain hundreds of ‘virtual
machines’ (VMs) but these require high resources that off-the-shelf personal
computers don’t have. So in our virtual hack lab we will start with only 2
virtual machines, which is more than enough to test out and apply basic
concepts.
What you will need:
- Host Machine with a minimum of 6GB of RAM and 80GB of available hard disk space.
- Virtualization Software: VMware Workstation Player
- Virtual Attack Machine: Kali Linux
- Virtual Victim Machine: Windows XP and Windows 7
Setting up the attack machine:
2. Download Kali Linux 32 bit VM PAE from here
3. Unzip the downloaded virtual machine
4. Start your VMware and go to File > Open
5. Using the Open dialog box, go to the folder where you unzipped the virtual machine. It should look like this on VMware:

6. Select the “Kali-Linux-2016.1-vm-i686” file and
select Open.
7. Now you should see a window similar to this:
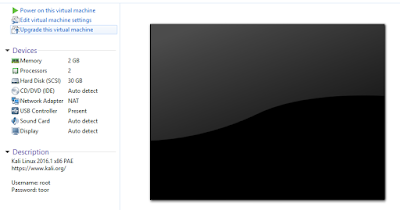
Let’s first take a quick look at the important settings displayed.

7. Now you should see a window similar to this:

Let’s first take a quick look at the important settings displayed.
- Memory: This is the amount of RAM that you will give to the VM. The more the better, however you should make sure to have at least 2GB for the host computer (your computer). And the remaining amount of RAM can be divided between your attack and victim machine
- Hard disk: This is the amount of space you will give to the VM. A preset of 30GB will do just fine for now. If you are running low on your total HDD space, you can reduce this to 20GB.
- Network Adapter: THIS IS IMPORTANT. A “NAT” setting on the adapter means that it shares the internet connection of your host computer, meaning it can talk over the internet. You should only choose NAT when updating the machine or downloading new tools. You should change this to – Custom: Specific Virtual Network: VMnet1 (Host Only). This will ensure that your attack machine cannot talk to the internet and you don’t mistakenly attack a live machine over the internet

For now, leave it at NAT. Because you will be updating
the machine in later stages.
8. Power on the virtual machine and you will see the following window.
8. Power on the virtual machine and you will see the following window.

9. Leave the highlighted entry at “*Kali GNU/Linux” and
press enter.
10. You will now see a grey screen with a username
input box.

CHALLENGE: Find out the username and password to login to
the attack machine.
One of the key traits of a hacker is research and an eye
to detail.
HINT: The credentials are already somewhere in this
article.
Welcome to your attack machine!

11. We will not do a tour of the machine yet. Open up the Terminal by clicking on the black box with an “$_” sign on the right panel.
12. And type in the following command from the picture below.

This command will update and upgrade your attack machine so
that you have the latest versions of tools and exploits.
It is going to take a while. So minimize the main VMware
window and let’s get our victim machines installed.
Quick Steps to installing windows 7 and windows XP.
2. As for the Win XP machine, Microsoft has ended distribution of test machines. (You can still find lots of XP machines from the internet, ill leave that to you)
3. Extract them both on separate folders and open
them up with your VMware.
4. Allocate 1GB of RAM and change the Network
Adapters to Custom VMNet1 (Host Only) for both of the machines. With HDD space
of at least 30GB for Windows 7 and 15GB for Windows XP.
That’s it.
Feel free to poke around your brand new attack machine after
the update is completed and you have SWITCHED the network adapter to custom
VMNet1 (Host Only).
On our next article we will start with using the attack
machine to talk to our victim machines.
-Jayesh Kerai (@secjay)
No comments:
Post a Comment
Note: Only a member of this blog may post a comment.